Saturday, November 10, 2012

Making

          I'm in the midst of reading Jane Dunnewold's newest book Art Cloth and can't say enough how wonderful it is to hear her acknowledge the importance of the "making" of our art.
So in honor of the making, I stepped out to my workshop and created this fiber art card for my mom, my mentor and inspiration.  It'll go in the mail tomorrow.

Tree           5 3/4" x 7"


Detail; hand-dyed and commercial cottons,
polyester organza, seed beads


Thursday, November 08, 2012

Mended Heart

          This fiber art card is going in the mail today to a friend with a mending heart.  Here's the order of the quilt sandwich from top to bottom:
*size 11 seed beeds, stitched on individually
*polyester organza (my eternal quest for the invisible organza is still on)
*machine embroidery (I always use quilting gloves to get a grip on the work)
*composition in cottons, no fusing necessary; the machine embroidery on top of the organza does the trick
*heavyweight Pellon--very stiff
*muslin (a.k.a. salvaged airplane wing cover)

          The next elements are added on the bottom after all the previous layers are stitched:
*fusible interfacing fused to the bottom muslin layer
*muslin
*binding is stitched on; stitch onto back first, fold over to front and stitch down close to edge; stitch another time around for design element


Sunday, October 14, 2012

Kickstart with gel printing

I needed a simple creative kickstart, so I tried gelatin mono printing. Here's my gel plate recipe:
-Mix one cup cold water with about 5 packets of Knox gelatin
-Add about 4 cups hot water
-Pour into a cookie sheet to about 1/2 inch deep
-Let set on counter until gelled enough to pick up without spilling
-Chill in refrigerator--or outside if the temps are cold, as mine currently are!

I dribbled Jacquard Textile paints on the surface of the gel and then used a Speedball brayer to spread the paint.
I drew the design with my finger.


I carefully laid the Kaufman Pimatex PFD cotton
onto the gel and rubbed gently.

Here's the fabric after the monoprint.

This was the series of the morning.  I also created texture with bubble wrap and a wine glass.
  These will be heat set and overdyed.

Of course, little helpers also want to give it a try!


Tuesday, September 04, 2012

Patterning

This is very soothing--a pen technique I'm learning from Zenspirations by Joanne Fink. The key is to take it slowly.  It looks similar to the Zentangles line drawing technique.

(4"x5 1/2") photo by Amy Mackinaw

Saturday, July 28, 2012

Ice Dyeing

Here are the steps I use to dye with ice:  Pre-soak the fabric (I'm using silk crepe de chine scarves) in a soda ash solution.  Squeeze out water and scrunch fabric into the bottom of a plastic container (dedicated to dyeing), layer with ice cubes, sprinkle with Procion MX dye (wearing a mask for protection, of course), and layer the whole thing again if desired with fabric, ice and dye.  Let sit for 24 hours at room temperature.  It can be hard to wait that long, but the surprises are worth waiting for.  Then rinse and wash out dye with Synthrapol.

The dye table is set up with ice, fabric, dyes, plastic spoons and containers.

Ice is sprinkled with dye using plastic spoons.

Cover the work with plastic wrap.

Wait 24 hours and unwrap.

The scarves have been rinsed, washed and tumble dried.

Here are the scarves after ironing.....mmmmmm....delicious.

Friday, July 06, 2012

Re-Re-cycled

This is a beautiful length of linen and two remains of cotton crocheted tablecloths from my mom's collection.  She used parts of the tablecloths for artwork in the 1960s and '70s when she was creating wallpieces that were collaged, gessoed, painted and antiqued. 

Now I have them, and after washing and drying on the grass today they'll join my stash.  Ideas are percolating.  What might you suggest?


 Handwork from another era.

Tuesday, June 26, 2012

Fiber Art Card gallery

Here is the photo of the mini gallery of fiber art cards displayed on the small wooden easels I made.  They are helpful for display and available for sale with the cards, if desired.

Mini Easels for card display (photo by Amy Mackinaw)

Monday, June 25, 2012

The view from the "wrong" side

Sometimes I'm surprised at the beauty of the back side of a project.  In this case, there was a lot of free machine embroidery.   Maybe I'll need to do more of this on the "right" side.   Are you ever inspired by the "wrong" side of your work?


Back


Front

Detail
 

Tuesday, May 22, 2012

Denali 20,320

This is the view from our campsite on the way home from Homer.  I searched through the high-power scope for climbers.  Shouldn't their bright-colored gear stand out against the blue-white snow?  Not this morning, anyway. 

I wish them all well, wherever they are.  As for me, it's back to work at elev. 600'.


Wednesday, May 16, 2012

Shorebird Egg collection

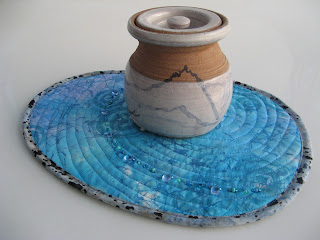
Here is the Shorebird Egg collection of Vase Mats.  They started out as Robert Kaufman Pimatex white cotton fabric and then I applied a flour paste resist to create the crackle texture with textile paint.  The paste was rinsed out; then they were dyed with Procion MX dyes and finally block printed with hand-carved circles.  Each is machine quilted and hand beaded.  The final quilt sandwich includes a layer of water-resistant fabric to protect a table surface. 


Tuesday, May 15, 2012

Homer views


It's been years since we've been to Homer, Alaska.  Somehow that 12-hour drive is hard to schedule.  But this trip was Oh so worth it.  Our visit coincided with the Kachemak Bay Shorebird Festival and there were lots of birds to see, and so many other things.  Here are some views--

all photos by Amy Mackinaw


Tuesday, May 08, 2012

Silk dyeing

Today I tried applying Procion dyes with a squirt bottle on silk.  It was a handy way to get a mottled effect.   My stand-by method comes from Ann Johnston's book, Color by Accident .  I can't wait to see the results.  These are the color groups I was trying to achieve and the dyes I used:

Lupine Field (iris/bright blue)
Bay Breezes (blue/turquoise)
Autumn Tundra (golden yellow/red)
Birch Bark (black)
Spruce Needle (blue/green)
Fireweed Meadow (fuchsia/iris)
Spring Birch (golden yellow/blue)

Sunday, May 06, 2012

Woodworking day

It took a little brainstorming in the lumber store aisles to devise the plans, but these small stands will act as easels for fiber art cards.  The blue tape will come off and polyurethane will be brushed on.  Stay tuned for photos of the mini-gallery of art cards.

Saturday, May 05, 2012

Block printing

I carved a block one morning this week to add texture to some previously hand-dyed, flour-resist-designed fabric and for a bold statement on plain muslin. 

Before I print, I lay down a sheet of thin craft foam on my work space, then freezer paper on top of that, shiny side up.  The foam offers a little "give" for a good impression with the block.

When printing on a larger piece of fabric I sponge my textile paint onto the block and use the block as a stamp.  If it's a smaller piece of fabric, not much larger than the carved block, I first sponge paint onto the block, then lay the fabric onto the block and rub gently with my fingers to get all the detail of the design.
A bold block makes a graphic statement.

The "crackled" flour-resist, dyed, block-printed fabric above is part of a bird's egg series.